
New


Qlipr Trellis System
$514.80 – $623.48 AUD excl gst
With the Qlipr System one person can save many hours weekly over other trellis systems (lowering, clipping, pruning and taking out shoots)
- An investment into effiency and high productivity
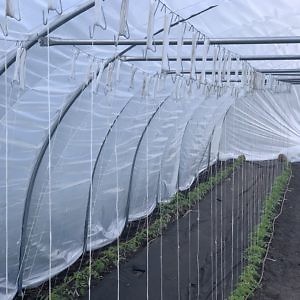
- Designed for efficient indeterminate tomato and cucumber production with single or double trellis crop wire greenhouse systems
- Fastening and lowering the plants is be done in one action
- As you don’t twist the plant, the fruit will hang to one side, harvest is also made easier
- Post crop time savings: No synthetic twine or plastic clips to deal with at the end of the crop cycle, makes for ease of composting, hygeine and pack down
Collections: Jodi Roebuck Collection, Neversink Farm Course Tool List, Six Figure Market Gardening Range
Qlipr Trellis System kits
The Qlipr system consists of a galvanised hook (PlanthooQ) with two stainless steel clips (Qliprs), equipped with a specially developed foam insert piece (ProteQ).
- 50 unit kit contains 50 PlanthooQs and 100 Qlipr clips, each with the foam ProteQ insert piece
- 125 unit kit contains 125 PlanthooQs and 250 Qlipr clips, each with the foam ProteQ insert piece
- Qord Hook option for hanging jute or sisal cord from base of PlanthooQ to soil sold separately
Tomato and Cucumber trellising system for indeterminate hothouse growing. Suited for commercial use or hobbyists.
The Qlipr system is a sustainable and easy-to-use stainless steel clamping system for cucumber and tomato plants
From lower to higher greenhouses, from single to multiple wire systems; the Qlipr system offers many applications. Even if you work with movable wire or gutter, Qlipr is an excellent system for you.
Video demonstration: Lowering and removing laterals at a rate of 600 mature tomato plants per hour
Method
One crop wire
1. Fasten the PlanthooQ to the crop wire at the top of the greenhouse. At the start of the cultivation, attach a jute or sisal string from the base of the PlanthooQ to the soil at the base of the plant
2. Attach the head of the plant with a Qlipr to the sisal/jute string. (Every time the plant has grown 30cm take an extra clip from the previous PlanthooQ on the row and attach this to the head of the plant)
3. Remove the bottom clip and attach this to the head of the next plant. As soon as the plant has reached the PlanthooQ the clips must be removed from the cord and attached to the PlanthooQ. Then attach the second clip to the head of the plant
4. The plant will now have two clips and can be lowered in the next round
Two crop wires (set at different heights)
The Qlipr system is also ideal for growers who work with two crop wires.
1. When starting the cultivation you attach the hook to the bottom wire, about 150 cm above the substrate. Then you connect the plant with one Qlipr clip to the PlanthooQ. When the plant has grown about 30cm, you move the Qlipr to the top. You repeat this till you have reached the PlanthooQ.
2. Towards the second crop wire
Once all plants have reached the top part of the PlanthooQ – and therefore the lowest crop wire – you have to take the next steps:
- Take one extra Qlipr clip and one extra PlanthooQ in your hand at the beginning of the row. Attach the new PlanthooQ to the top crop wire on the RIGHT SIDE and fasten the first plant with the extra Qlipr to the new PlanthooQ.
- Remove the old Qlipr so this will become the extra Qlipr. The PlanthooQ at the bottom wire will become the extra PlanthooQ. Repeat this process till you have done the entire row. You have now fastened all plants to the PlanthooQs to the top crop wire. Make sure all the heads have been lowered to he same height.
3. After the plants have grown 35 centimetres it is necessary to use an extra Qlipr to help the plants grow. Each plant will now be fastened with two Qliprs. (In case of heavy varieties such as beef tomatoes you have to use three Qliprs).
4. Lowering the plant
- After the plants have grown another 35 centimetres it is time to lower the plant.
- Before moving the bottom Qlipr to lower the plant push the PlanthooQ aside.
- When removing the bottom Qlipr the top Qlipr will be lowered automatically with the plant alongside the PlanthooQ.
- Now attach the head of the plant with the Qlipr from the bottom.
In case some heads haven’t reached 35 centimetres above the top Qlipr: don’t lower these plants but move the top Qlipr upwards (closer to the head). In contrast with traditional cultivation methods, the plants can grow above the wire with Qlipr.
5. Making extra heads
Making extra heads can be done easily and quickly with the Qlipr system.
- An extra PlanthooQ is hung next to those plants which have been selected to grow the new shoot.
- After the plant has been lowered place the Qlipr under the correct shoot.
- Once the main head has grown about 35cm, lower the plant once again and replace the bottom Qlipr to the head of the shoot.
- The new head can now grow further alongside the existing PlanthooQ. The main head doesn’t need any work.
Next round: you only replace the top Qlipr to the top of the head and you attach the main head to the extra PlanthooQ with a Qlipr with a different coloured ProteQ insert. (this is optional; you can also use the same colour your normally work with).
Next round: remove the bottom Qlipr, lower the plant and even the heads to the same height in the same row. The main head will lower automatically as it has only one Qlipr. Then move the Qlipr from the main head to the top of the head.
After approximately 5 rounds you place an extra Qlipr with the different coloured ProteQ to the main head. (Once again this is optional: you may opt for the same colour you normally work with)
6. At the end of the cultivation
After the plant has been lowered and the head has been removed, the plant will still hang on to two Qliprs and you can harvest the fruit again.
Next round: The head will continue to grow so now you attach the top Qlipr above the last fruit.
Next round: Lower the plant to a level where you can harvest the fruit for the last time and place the bottom Qlipr in a box for disinfection.
Next round: Harvest the fruit. When clearing the cultivation you grab the plant, remove the Qlipr and place it in a box for disinfection and let the greens fall to the floor. The greens can now be cut into pieces and composted without the issues of synthetic twine or plastic clips.
You may also like…
-
 New
NewCraig RZ | F1 Lebanese Cucumber Seed
$14.77 – $457.05 AUD excl gst Select options This product has multiple variants. The options may be chosen on the product page -
Cross Bracing Trellis Pole Kit
$67.60 AUD excl gst Add to cart -

Moscatel RZ | F1 Truss Cherry Tomato Seed
$11.01 – $542.98 AUD excl gst Select options This product has multiple variants. The options may be chosen on the product page
Related products
-
Shop
-

Spreader Frame
$73.90 AUD excl gst Add to cart -

BioCal+ Probiotic Calcium Booster
$22.13 – $251.77 AUD excl gst Select options This product has multiple variants. The options may be chosen on the product page -
Quick Cut Greens Harvester | Model 1503
$1,717.72 AUD excl gst Add to cart